Пошаговое руководство по записи видео с экрана в формате 4K на Mac

В эпоху, когда видеоконтент является королем, запись экрана стала важным инструментом для педагогов, геймеров, демонстраторов программного обеспечения и создателей контента. Но если вы хотите, чтобы ваши записи выглядели четко и профессионально, разрешение 4K — это то, что вам нужно. Благодаря четырем пикселям Full HD, записи экрана 4K обеспечивают превосходную четкость и детализацию — идеально для современных дисплеев с высоким разрешением. Если вы пользователь Mac и вам интересно, как записать свой экран в 4K, это пошаговое руководство проведет вас через все, что вам нужно знать.
1. Может ли macOS записывать видео в формате 4K изначально?
Да, macOS может записывать экран в формате 4K , но с подвохом: разрешение вашего экрана имеет значение. Если ваш дисплей Mac (или внешний монитор) поддерживает 4K или выше, то исходная запись будет соответствовать этому разрешению.
2. Необходимые условия для записи экрана 4K на Mac
Чтобы гарантировать, что вы действительно записываете в формате 4K, необходимо соблюсти несколько технических требований:
- ✅ Дисплей 4K или Retina (iMac, MacBook Pro или внешний монитор 4K)
- ✅ Достаточно места на диске (видео 4K большие)
- ✅ Высокопроизводительный Mac (рекомендуются чипы M1/M2/M3)
- ✅ Устройство для записи экрана с разрешением 4K
Чтобы воспользоваться преимуществами 4K, ваш экран должен поддерживать разрешение 3840×2160 или выше. Подходят самые последние модели iMac, MacBook Pro с дисплеями Retina или компьютеры Mac, подключенные к внешнему монитору 4K.
3. Запись экрана Mac 4K с помощью встроенных инструментов
3.1 Запись экрана Mac 4K с помощью QuickTime Player
QuickTime Player — это собственный медиа-инструмент Apple, включающий базовые функции записи экрана.
Шаги:
- Установите разрешение дисплея на 3840×2160 (4K), затем откройте QuickTime-плеер из раздела «Приложения».
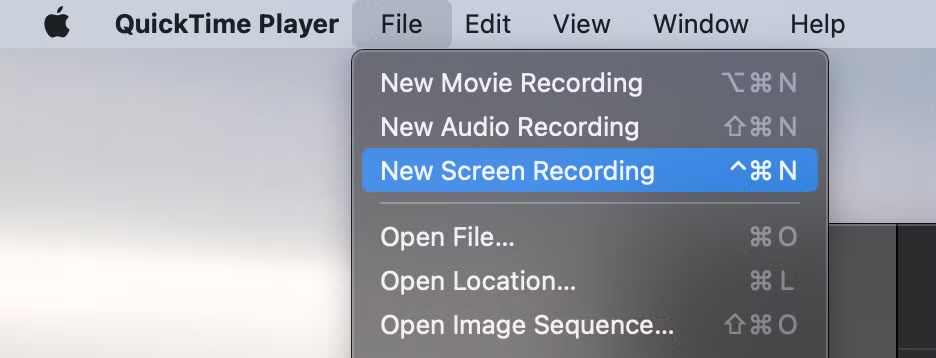
- Перейти к Файл > Новая запись экрана > Нажмите на раскрывающийся список, чтобы выбрать микрофон (при необходимости)
- Нажмите Записывать для захвата всего экрана или выбранной его части
- Нажмите Останавливаться из строки меню, когда закончите.
3.2 Запись экрана Mac 4K с помощью панели инструментов скриншотов
Вы также можете использовать встроенную панель инструментов для создания снимков экрана macOS:
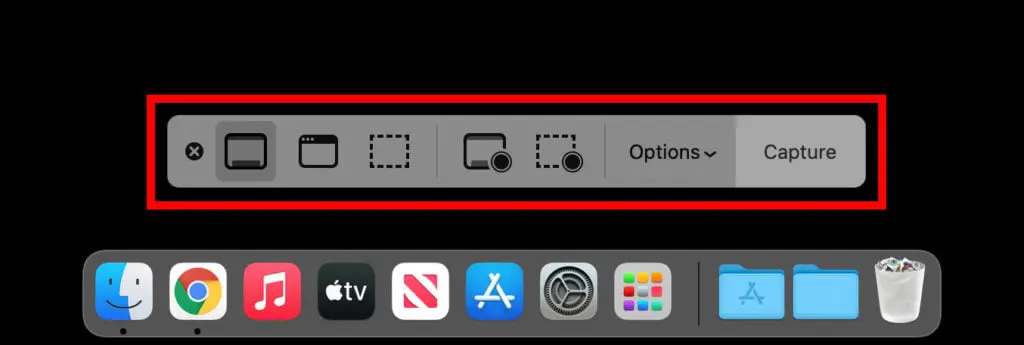
- Убедитесь, что ваш дисплей поддерживает разрешение 4K, и нажмите Cmd + Shift + 5
- Выберите, следует ли «Запись всего экрана» или «Запись выбранной части»
- Нажмите Параметры для выбора устройств ввода и сохранения местоположения
- Нажмите Записывать для начала и используйте значок остановки в строке меню закончить.
3.3 Ограничения собственных инструментов
Несмотря на бесплатность и простоту использования, встроенные инструменты macOS имеют ряд ограничений для профессиональной записи в формате 4K:
- ❌ Нет явного контроля разрешения
- ❌ Нет наложения веб-камеры
- ❌ Ограниченные настройки аудиовхода
- ❌ Нет инструментов для аннотаций и редактирования
- ❌ Нет возможности легко сжимать или конвертировать форматы
Если вам нужен лучший контроль и больше функций, то сторонние приложения — это то, что вам нужно.
4. Запись экрана Mac 4K с помощью OBS Studio
OBS Studio — популярный бесплатный вариант для геймеров и стримеров с полным контролем разрешения, битрейта и звука.
Шаги:
- Загрузите OBS Studio с сайта obsproject.com и установите на свой Mac.
- Нажмите « + " под Источники > выбрать Захват дисплея > выберите свой дисплей.
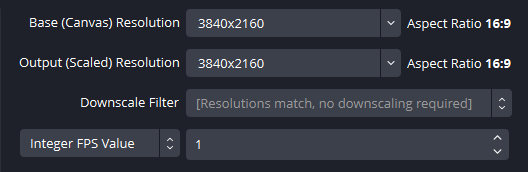
- Перейти к Настройки > видео , установите: Базовое (холст) разрешение: 3840×2160; Выходное (масштабированное) разрешение: 3840×2160; Установите FPS на 30 или 60.
- Перейти к Настройки > Выход установить высокий битрейт (около 20 000–40 000 Кбит/с) для получения четкого качества 4K при 30–60 кадрах в секунду.
- Когда ваш дисплей и настройки будут готовы, просто нажмите Начать запись , выполните действие на экране, затем нажмите Остановить запись по завершении видео 4K будет автоматически сохранено в выбранном вами месте.
Плюсы:
- Запись в формате 4K со скоростью до 60 кадров в секунду
- Расширенное управление сценами и источниками
- Поддерживает наложения, переходы и прямую трансляцию
Минусы:
- Более крутая кривая обучения
- Сложный пользовательский интерфейс для обычных пользователей
5. Простая запись экрана Mac 4K с помощью Recordit
Для тех, кто ищет наилучший баланс простоты и качества, Recordit — лучший выбор. Это чистое, интуитивно понятное приложение для записи экрана для Mac, которое поддерживает настоящий захват видео 4K, наложения веб-камеры и микрофонный вход — и все это без необходимости крутого обучения.
Основные характеристики Recordit :
- Запись экрана в формате 4K одним нажатием
- Захват всего экрана или выбранной области
- Поддерживает микрофон и системный звук
- Наложение веб-камеры (опционально)
- Быстрый экспорт в распространённые видео/аудио форматы (MP4, MOV, MP3)
- Делайте снимки экрана высокого качества
- Чистый интерфейс, минимальная загрузка ЦП
Действия по записи экрана 4K на Mac с помощью Recordit :
- Скачать и установить Recordit Загрузите версию для Mac с официального сайта и установите программное обеспечение.
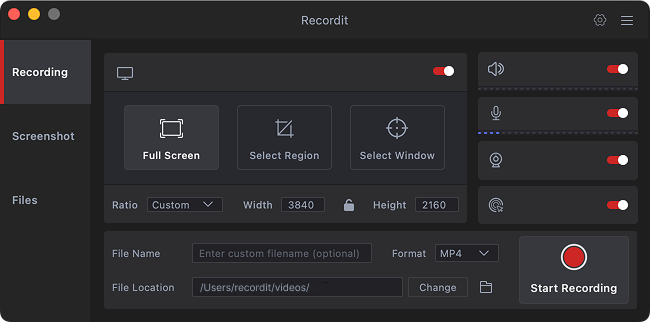
- Запуск Recordit , установите разрешение 3840×2160 (4K) , затем настройте дополнительные параметры записи, такие как звук, формат вывода, эффект мыши и т. д.
- Выберите регион записи и нажмите Начинать Запись , выполните действия на экране и Recordit сделает снимок экрана в режиме реального времени.
- Нажмите Остановить запись , затем перейдите к программному обеспечению « Файлы ” для предварительного просмотра видео.
6. Заключение
Запись экрана Mac в формате 4K не обязательно должна быть сложной. Используете ли вы встроенные инструменты macOS для быстрого захвата или более продвинутое программное обеспечение, например OBS Studio, для видео профессионального уровня, достижение кристально чистых записей в формате 4K вполне достижимо — при условии правильной настройки и разрешения экрана.
Однако если вы ищете идеальный баланс мощности и простоты использования, Recordit выделяется как лучший вариант. Благодаря интуитивно понятному интерфейсу, захвату 4K одним щелчком, поддержке веб-камеры и звука, а также быстрым опциям экспорта, Recordit делает высококачественную запись экрана доступной для всех — без крутой кривой обучения, без технических сложностей. Если вы хотите создавать четкие, отполированные видео 4K на вашем Mac без перегрузки, Recordit — это надежный инструмент, на который вы можете положиться.